A little bit of background first, before I dive into the DIY tutorial to make your own painted drapes:
My husband and I just moved into a rental house in Albuquerque last week. The house has so much light and beautiful hardwood floors. BUT.... the walls are blue, not my choice for a living room. Actually, every single room in the house minus one (my sewing room, I get a SEWING ROOM!) is painted some shade of blue or greenish-blue. Alas, this too shall pass. But not when we're living here, because as I said, it's a rental. Anyway. The window treatments in the living room were vertical metal shades. Gross, it's kind of like a dorm room. Those have to go. The huge catch is that the house was built in the 1940s and it's lath and plaster wall construction, which means that I can't drill any holes in the walls. Well, I could, but then we'd be out our security deposit. So here's the challenge: cute, functional, inexpensive window treatments that I can't actually use any hardware to connect to the wall. Hmm.
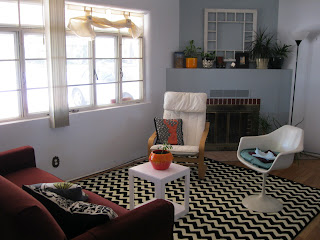 |
| Living room now, with the metal shades still up and one window outfitted with my homemade "Roman" shades. (Don't mind the lack of coffee table... this room is still a work in progress...). |
So I began to brainstorm: tension rods wouldn't work, the width of the window is 104". Also, the wall is kinda beveled in towards the window frames, so I don't think it would grip well anyway. I tried to imagine rigging something on top of the current nasty metal shade structure, but then it would look like I mounted something on top of a nasty metal shade structure.
I had a breakthrough when I realized that the window frames are metal! Magnetic curtain rods! So, I bought four of those babies from Big Lots to span the window. It's actually two window frames right next to each other, and I want them to look like two separate windows. I bought some muslin at JoAnn's with a 40% off coupon - score! I wanted Roman-esque shades without actually needing to purchase any extra hardware (did I mention I'm on a super tight budget??). So I fashioned a couple of tabs so that when the shade is up, the tabs just loop around the fabric and button at the top. See? This whole shade fix was about $30, mostly because of the magnetic rods.
Now onto the star of the show, three drapery panels. I love damask patterns, but sometimes it's just too formal. I wanted a casual, youthful take on damask, but all of the fabrics I liked were just way too expensive. So, I purchased two 6'x9' dropcloths at Lowe's and cut them in half lengthwise and ended up with four panels. I only need three for my project, so now I have an extra piece that I can use to make pillow covers or maybe a shade for my dining room window.
Now, these panels can't be mounted to the wall with curtain rods or hardware, so I'll put several command hooks on the wall close to the ceiling and sew little tabs onto the back top of each panel. They'll be stationary panels and just for aesthetics.
There are plenty of really cool, large scale stencils out there that I could have used, but again, I didn't want to spend $50 on one. (
Olive Leaf Stencils has some really cool ikat stencils). But I do have an Exacto knife and an empty cereal box, so I created my own stencil! I found an image in a textile design book, scanned it and enlarged it to the correct size and printed it on regular printer paper. I taped the paper to my cereal box and cut it out with my Exacto knife. It felt like sophomore year in design school all over again. The design that I chose actually has two components, so I have two stencils.
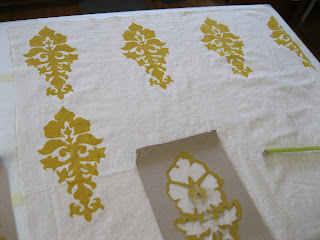
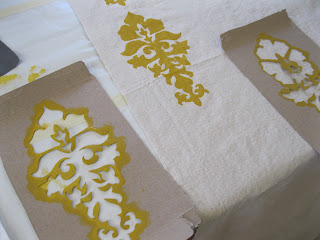
Now I'm in the process of stenciling them to the drop cloths. I taped wax paper on the whole surface of my craft table to protect it, and started working. Before I started to paint, I had dimensions for spacing out the stencils planned out, so all I had to do was measure and start painting. I used a stubby little foam stencil brush and used acrylic craft paint mixed with textile medium. The textile medium turns the paint into fabric paint, and makes it less stiff when it dries and machine washable. Nifty, huh?
Now, this is going to take me forever, but we'll see how it goes!